

We (my daughter, Laura, and granddaughter, Faith) used 14 gauge wire which we bought at Michael’s Craft Store. It’s really thick and easy to work with...

Here is the wire and a few of the charms we collected.

I cut off between 11” and 12” off the roll being careful not to make the wire misshapen.

Then you need little needle nose pliers to form a little loop and you have to turn it so that the other end of the wire can go right through it.

Put beads on the end that doesn’t have the loop.

Now put that end of the wire through the loop..

Add some feature beads..

After adding some feature beads make a closing loop. Loop around the bottom wire.... like this. If you have a bracelet to copy, it will be easier to understand. You need to make a rectangular box... one wire loop goes up and the other loop goes down as in the picture. It makes a little box .. a long box. This is the hardest part of making the bracelet, getting the loops in the right place so that the other end of the wire goes through it. Now you have closed the bracelet and it’s finished.
")
You can make your bracelet smaller by squeezing it... like this.

To make it larger, pull the wires apart until you have the right size.
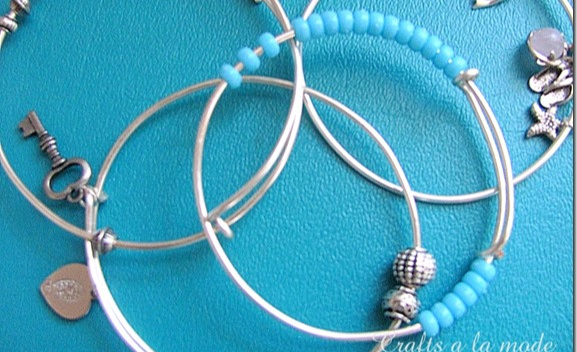
Here are some of the bracelets we made.

Making these loops is easy but challenging to get them just right. A few of the bracelets came out sorta misshapen..

My granddaughter wearing her new bracelets..


We had a lot of fun making these bracelets.
")
Please follow me on PINTEREST.
I hope you enjoyed this. If you like these bracelets you can MAKE them.
Feel free to PIN. Thanks for viewing and for following.
Your friend,

Hi there and WELCOME!
So happy that you came by to visit. I’m Linda (on the right in the picture). I’m the blogger.
 My sister, Carol (left) and I love learning new things to make and do and I blog about it right here on Crafts a la mode by Two Succulent Sisters.
I’m so looking forward to having you join us and would love to have you join our community by subscribing via email or RSS feed.
If you follow us in any way please leave a message and we will follow you back. Thanks for being here!
Follow by EMAIL  or follow by RSS Feed
or follow by RSS Feed 


So pretty. You make it look easy. I always pass all the jewelry isle at Hobby Lobby, but now I will have to try something.
ReplyDeleteWhat a cute bracelet! This is a great way to take advantage of the natural shape of the wire spool. I've got several jewelry tutorials on the blog if you are interested. One way of helping the bracelet keep its shape would be to harden it with a hammer or mallet. I talk about these tools in my Easy Peasy Earwires tutorial.
ReplyDeleteI like how simple this tutorial is though. Simple to construct and tools required. I've pinned it. Thanks for sharing with us!
I will definitely check out your other tutorials! Thanks!!!
DeleteOh boy, I am going to have
ReplyDeleteto make some of these!
You had be at bracelet.
Thes are grest for
different wrist sizes.
:o)
They are so easy to make, and can adjust from normal adult size wrists to child size wrists. My daughter Faith and I can both wear the same bracelets. :)
DeleteReal pretty - I also like the one with the turquoise beads. Thanks for the tutorial.
ReplyDeleteWonderful idea! I like the fact that they're adjustable and that make them look even more cute!
ReplyDeleteThat's so cute! My almost 7 year old grand daughter was just telling me how much she loved charm bracelets (hint hint grandma!). Her birthday is coming up in October. This is going on grandmas list! Thanks for sharing! I came here via flamingo toes :)
ReplyDeleteI love these bracelets! And what a perfect project for tweens and teens!
ReplyDeleteNoreen
Crafty Journal
Cute charms! Thanks for sharing @ Submarine Sunday!
ReplyDeletePinned!
ReplyDeleteNoreen
Crafty Journal
What a cool project! You make it look so easy! Great job and thanks for linking it up in the Bowdabra Crafty Showcase! Check out the new linky! http://bowdabrablog.com/2013/08/10/bowdabra-crafty-showcase-with-housewarming-gift-ideas-66/
ReplyDeleteHave a super week,
Susie @Bowdabra
These are adorable! How cute!!!
ReplyDeleteStopped by from Adorned from Above to pin your fantastic bracelets...I just love them!
ReplyDeleteHugs to both of you,
JP
you did a fabulous job! :) did want to let you know that alex and ani have a so called patent on this method are VERY happy to sue every 5 minutes so not sure if you want anyone to pin it :(
ReplyDeleteThis is great Linda! I've pinned this because my daughter would *LOVE* to make these for herself and all her BFFs.
ReplyDeleteLove it!!) thank you !
ReplyDeleteThose look so simplistic and I love it. I may have to try these out for myself
ReplyDeleteHey, new follower from the No Rules Blog Party. These are awesome! Totally going to have to try making these for myself. :)
ReplyDeletexo,
Kristin
aboutagirl.ca
So cool - and you make it look so easy :) Dropping by to let you know that your post is being featured at this week's Freedom Fridays :) The party goes live at 8:30 pm EST - hope to see you there ♥
ReplyDeleteHi ladies, Happy New Year! This is a great idea and you save so much money! I will try and make one with my daughter some time. I saw this on Freedom Fridays. Have fun crafting in 2014!
ReplyDeleteJulie at Julie's Lifestyle
Thank you so much for linking up to the Link It or Lump It Link Party! The bracelets you made are so beautiful. We've love it so much that one of my co-hosts has picked your project as a feature this week! Come on over and grab a button and link up again. http://www.twoityourself.com/2014/01/link-it-or-lump-it-party-20-plus.html
ReplyDeleteI think you can stop being a blogger and start selling your bracelets. This look so professionally done and I love it so much. Thanks for joining 4 seasons blog hop. Cheers and have a nice day. Pin in the Group's board
ReplyDeleteI am new to jewelry making, (just getting tools together so far). I'm going to visit the the granddaughters next month & this is going to be our jewelry project. I'm sure all the girls will love making these bracelets.
ReplyDeleteThank you so much ladies ❤
I am new to jewelry making, (just getting tools together so far). I'm going to visit the the granddaughters next month & this is going to be our jewelry project. I'm sure all the girls will love making these bracelets.
ReplyDeleteThank you so much ladies ❤
I'm going to visit the granddaughters next month and this is going to be our jewelry project.
ReplyDeleteAll my girls are going to love making these bracelets!
Thank you so much ❤
These are great; so pretty and simple! Pinning for sure, and thanks so much for sharing this at Creativity Unleashed!
ReplyDeleteHi Linda, I love these bracelets. My daughter and like to make bracelets, though we've be a little too busy this past year. Maybe we can get back into the goove this winter while it's so cold. Thanks for the tutorial too. We've never used wire, we usually make stretch bracelets. Pinning and sharing.
ReplyDeleteOkay, I just spent... well I won't say how much-- on bracelets just like these at a store. Now that I know how to make them, I'll do that instead and be able to get exactly what I want on them.
ReplyDeleteThis is such a cute idea! I love how customizable they are!
ReplyDeleteThose bracelets are truly beautiful =) And they look incredibly easy to create too.
ReplyDeleteNice and simple! Thanks for sharing!
ReplyDeleteWho knew those were so simple to make! Great post! :)
ReplyDeleteLove this bracelet! I am going to have to try it. Visiting from SITS! Just pinned it!
ReplyDeleteVery pretty! Thank you for sharing at Party In Your PJ's.
ReplyDelete